Do you love pickled beets? Do you love hard-boiled eggs?
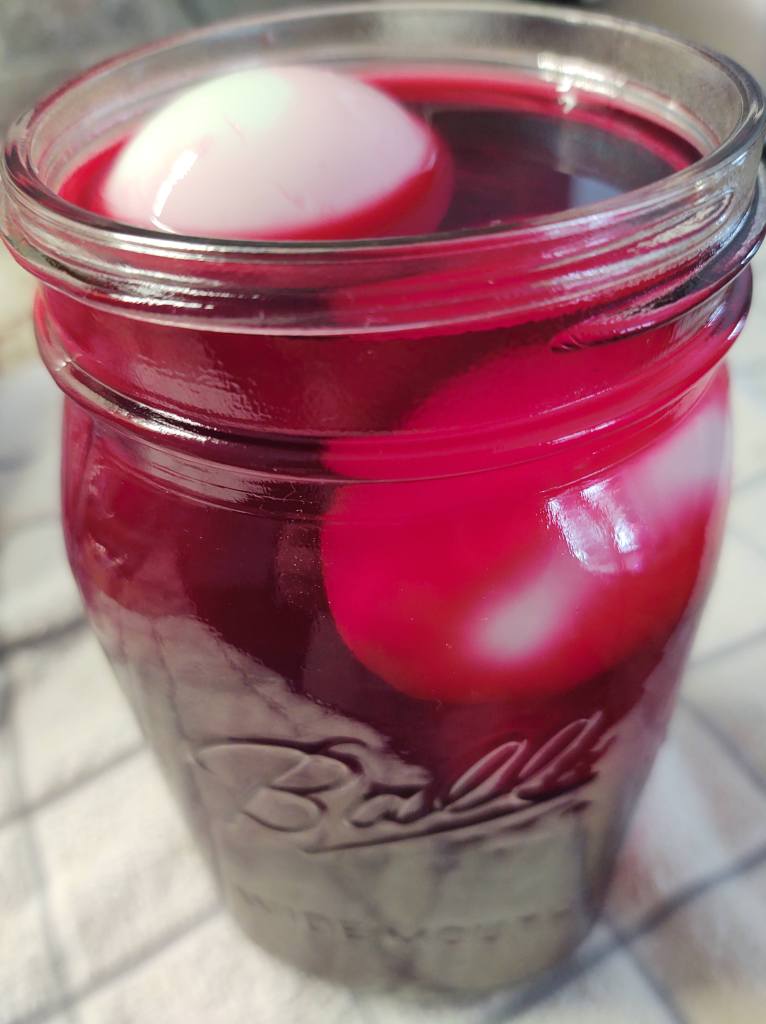
Meet the best of both worlds…pickled beet hard-boiled eggs!!
The Process
Once you’ve finished a jar of pickled beets, whether from the store or home canned, save that brine! Decant it through a fine mesh strainer into another jar (I use a quart-sized canning jar). This will remove any sediment, chunks of beets, or any whole spices that may have been added.
Beet juice after straining – store in fridge until ready to use
Boil up and peel some hard-boiled eggs and stuff in jar.
Hard -boiled and peeled eggs
You should be able to fit about 6 in a quart jar, but I’ve done as few as 2.
Add peeled eggs to brine
Now, most importantly, label that jar! Write the date the eggs were added, along with the fact that they are pickled eggs. You can also write the date they will be ready.
Dated and labeled jar
Put the jar in the refrigerator!!
We like them anywhere from 5 weeks on. This is what they look like at 5 weeks, but as time goes on, the beet coloring will go all the way through the egg yolk too! We’ve had them after 8 months and they are still good.
Beet egg at 5 weeks
This brine can also be re-reused. I’ll generally put a couple batches in the same brine (strained of course).
These are great as a flavorful snack. Also great with a cold beer (reportedly). Heck, you can even use them in your potato salad, just be aware that your potato salad may turn a bit pink!
Whether your onions are store-bought or home grown, proper curing and storage in the home are crucial to how long they will remain firm and delightfully usable.
For this blog, I’m talking about the 300 onions I started from seed in early March and nurtured through to harvest in early August. They have been stored in the coolest place in my home (under the basement stairs) in plastic totes for the last 7 months. There are 30 of them left and they are still perfectly firm, dry, and yummy!
Why grow your own onions anyway?? It sounds like a lot of work and onions are cheap at the store, right? The simple answer is: I know where my onions came from, how they were grown, how they were harvested, and how they were cured. Besides, a successful harvest makes me happy – like wag my tail happy! Plus, well, onions!!
Once started and planted out, onions are a pretty hands-off crop. Keep them weeded and mulched (if necessary) and that’s about it. If they’re looking sad, some bone meal fertilizer may help.
When the onions mature and the necks begin to close, the greens will fall over about an inch and a half from the bulb. Once the onion has cured, this is generally where you will cut the now brown greens off to them put into storage.
Are they Ready to Harvest?
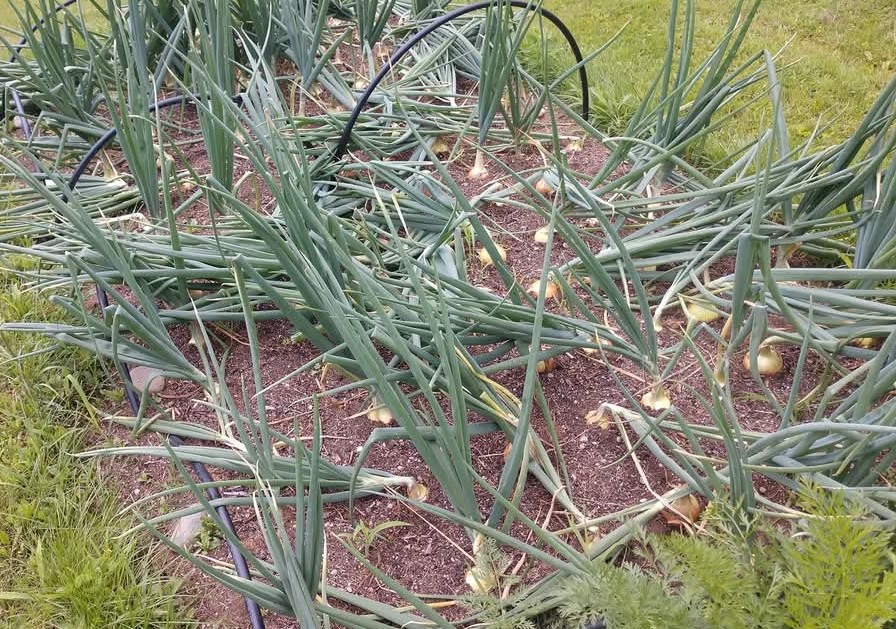
Each type of onion has a different time to maturity, but the whole patch of one variety will “fall over” at about the same time.
Onions almost ready to harvest
If most, but not all have fallen over, gently bend the stragglers over to match their bed mates.
I generally leave the onions “fallen over” for a week or two, depending on the weather. Do not water the onions during this time as they are forming their protective paper-like skins at this time. Of course, if it rains, it rains – there’s nothing to be done about that! You want to harvest the onions on a dry, sunny day so they can be left in the sun to dry out a bit after harvest and to start the curing process.
Here in New Hampshire, dry sunny days with temps above 55 at night aren’t easy to come by, but we do the best we can.
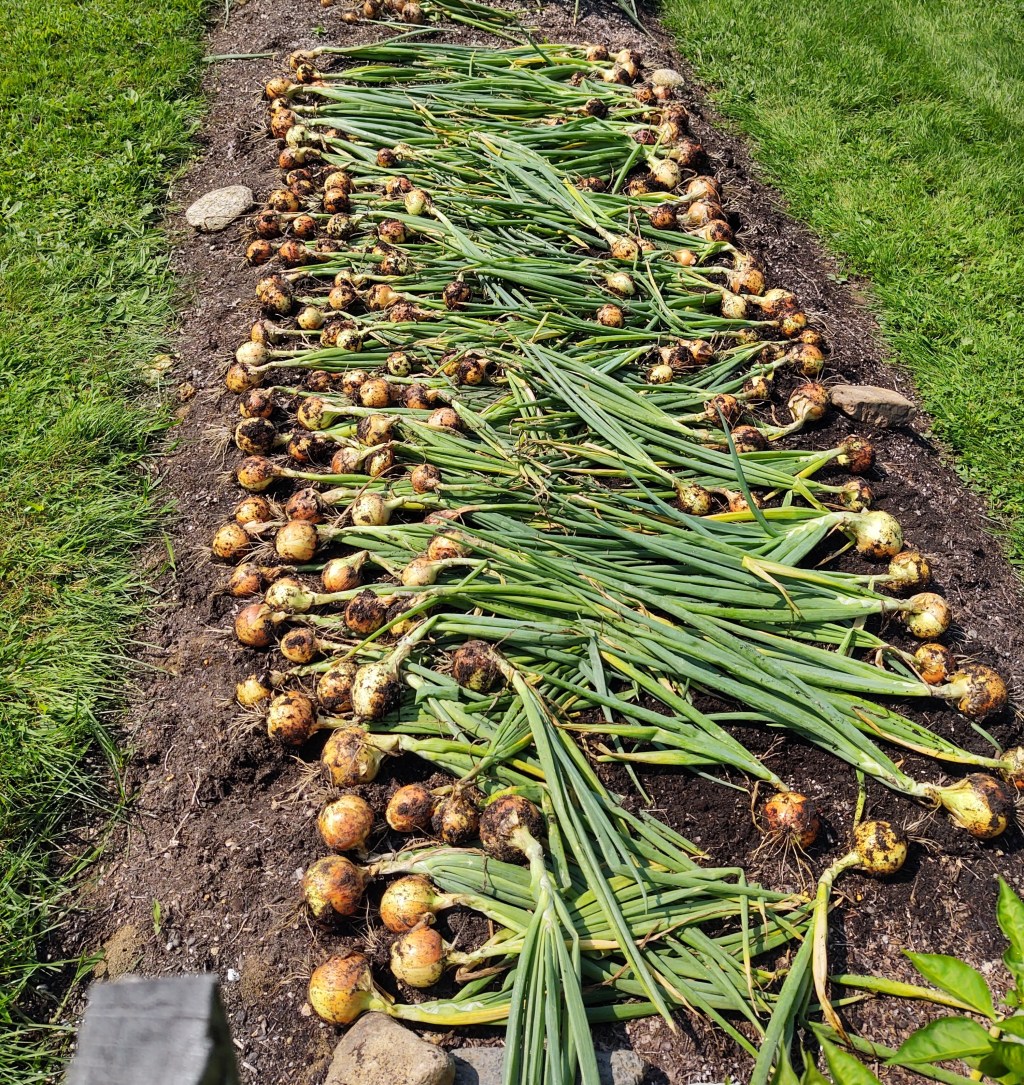
Harvested & drying in the sun
Harvesting & Curing
In the morning of harvest day, as soon as the sun dries off the morning dew, pull the onions and lay them out in a single layer right on the soil to begin the curing process. Let them sit in the sun as long as possible. If it’s going to be a warm night, leave them for the next day, but if there is any chance of rain, dew in the morning, or temps below 50, get them under cover for the hanging portion of the program.
Finding a good place to cure onions can be a challenge. Drying works best in a warm, low humidity area with good air movement. That being said, I’ve tried outside in a mesh wagon under the garage overhang and in the shed on screens or hanging through old wire shelving, but the problem has been the humidity in New England and the Northeast. If it’s not about 80% humidity, it’s rainy and cool.
What I did for the first time last year was bring my drying racks inside and hang them in the basement. A dehumidifier was a great help as we do not have air-conditioning to draw moisture out of the air. The dehumidifier was set to 55% humidity and the temps were around 65 F. I kept the room fairly dark. When the dehumidifier runs, it blows quite a bit of air around, helping to cure the onions.
Drying rack system in use
This photo was from the prior year showing drying the onions in my “she shed”. I have since moved these racks into the basement and replaced the ropes with chain to make them easier to raise and lower.
Having gently knocked any remaining soil off each onion BEFORE bringing them into the house, I threaded them into old wire-shelving and oven racks from an old oven. They can be laid on old window screens resting on sawhorses; however with 300 onions, that would take up a lot of space.
It is best to leave the green tops uncut when drying; however, in order to maximize my space, I had to trim some of them a bit. I did this after hanging them so I only cut them enough to not lay on their bunk mates.
Because I had to cut them, they made quite a mess by dripping on the floor (and each other), but this had no effect on how they cured and how they stored.
Curing time varies greatly, depending on all the variables, but they should hang until there is absolutely no green left in the onion tops, the tops are papery and crumbly, and the necks are closed, meaning there is no resistance when they are bent at the same spot on the onion top where they fell over while in the garden. For me, this is generally 3-4 weeks.
At this point, cut each top to within 1 to 1.5 inches from the onion and ensure there is no wetness at all in that cut. If you still see a little moisture, let them hang for another week or so.
Also, remove the wiry root hairs at the same time. They will usually just rub off easily, or they can be cut off. Be sure to not cut into the onion or even into the “root ball button” on the bottom of the onion.
Storing
I store my onions in plastic greenhouse racks or old milk crates, basically something that will allow the onions to breathe, but not fall out of the box. You can also use mesh “onion bags” and hang them in your storage area.
Talon F1 onions in storage
Store in a cool, dark place (55-65 F) – NOT in the fridge – with low humidity. By the time I get into winter, the humidity in my basement is below 30%.
Because I don’t have a root cellar or unlimited fridge space, I store everything under the basement steps. Each in its own container. This means potatoes, onions, garlic, butternut squash, and pumpkins are all in residence at the same time.
Onions, for me, are a topic I could talk about for hours. There are many other things that go into growing your own onions and many different ways to do what I’ve described above, but this is my method, tweaked yearly over the last 10 years and what works best for me.
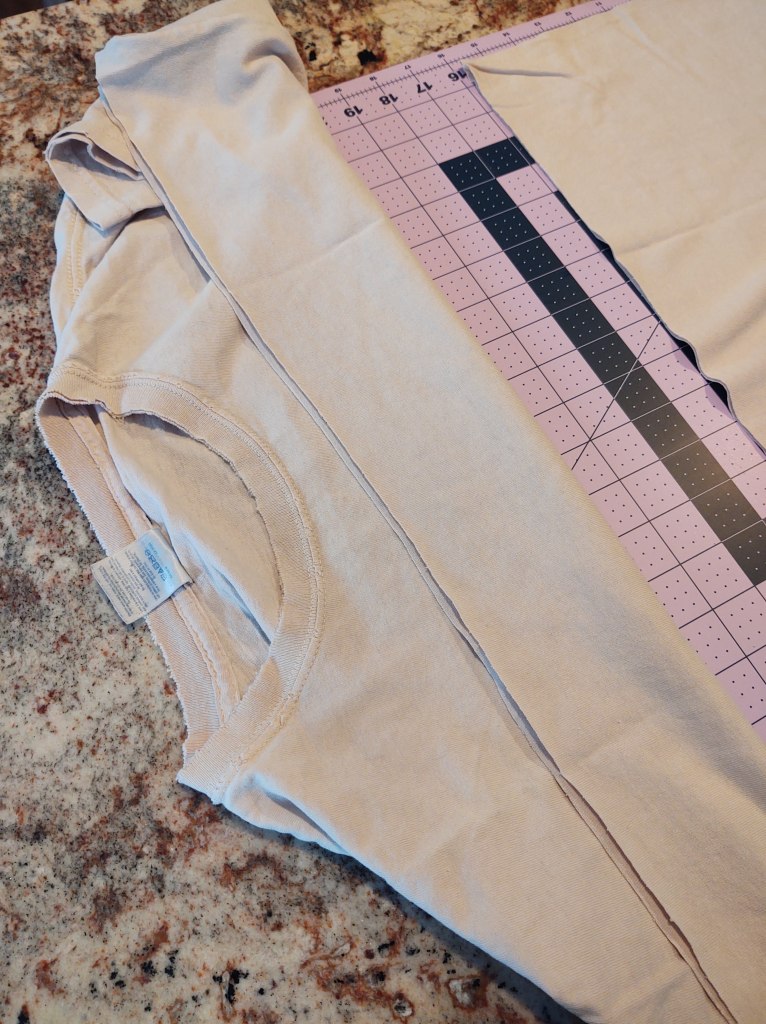
Lay shirt on cutting pad and cut straight across under the armpits. Discard the top of the shirt
Neck and shoulders cut off shirt
Cut the hemmed edge off from the bottom of the shirt
Cut hemmed bottom edge from shirt
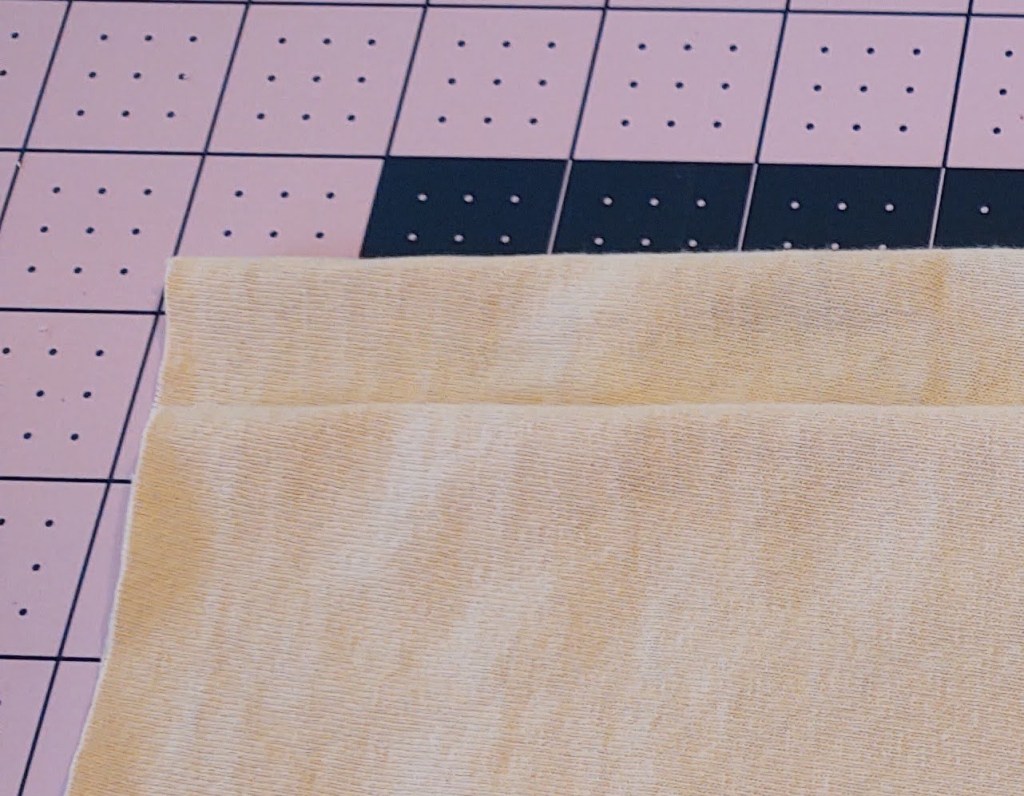
Turn so one of the sides is at the bottom and fold almost in half to the other side, leaving about an inch at the top. Make sure the “bottom” is actually a fold. The two open ends should be left and right.
There are now 4 layers of shirt, except for the very top inch, which will be 2 layers.
Fold bottom to topClose up – fold bottom to top
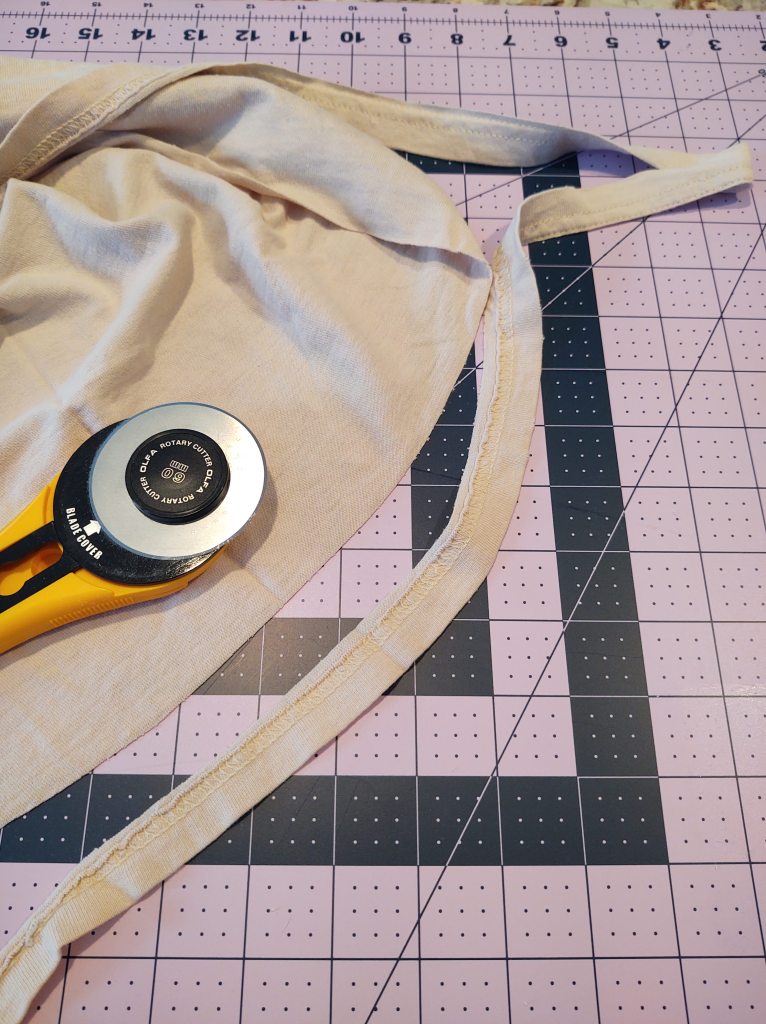
Using the rotary cutter or scissors, even up the left and right sides and discard the extra. These sides should both be open, with only the fold at the bottom and staggered area at the top.
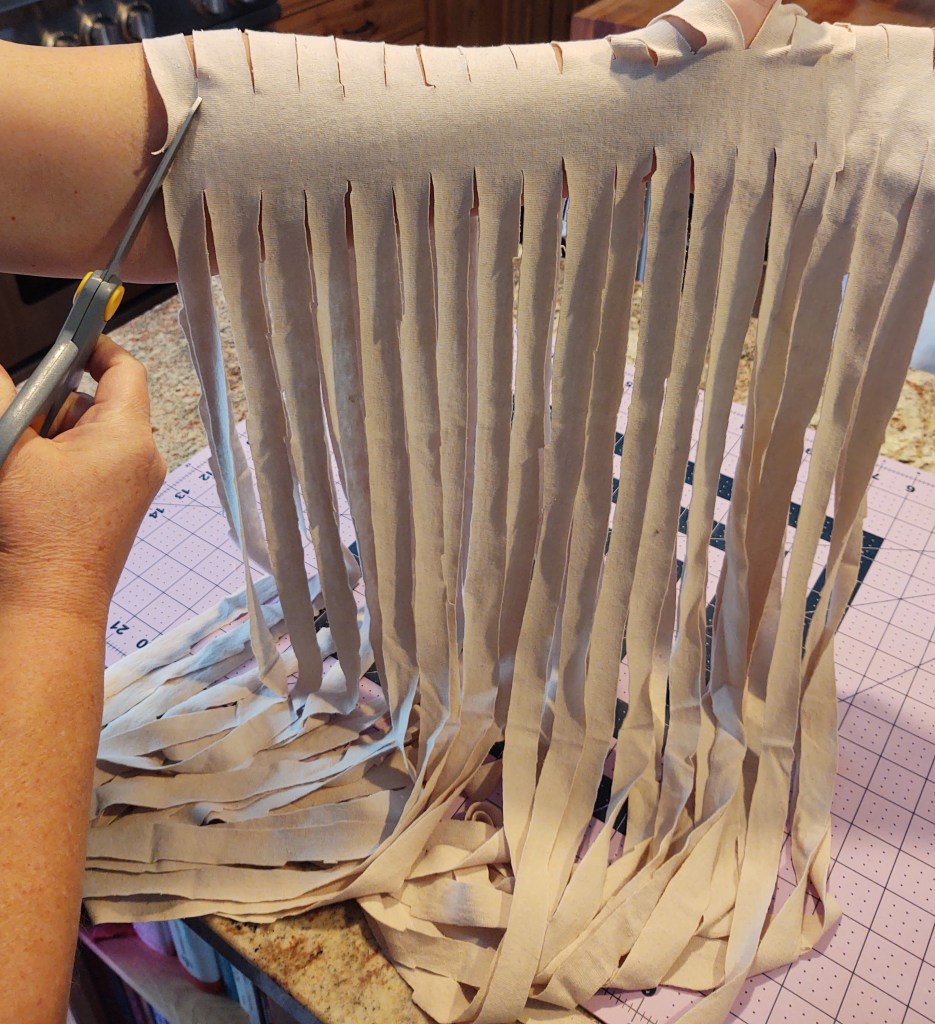
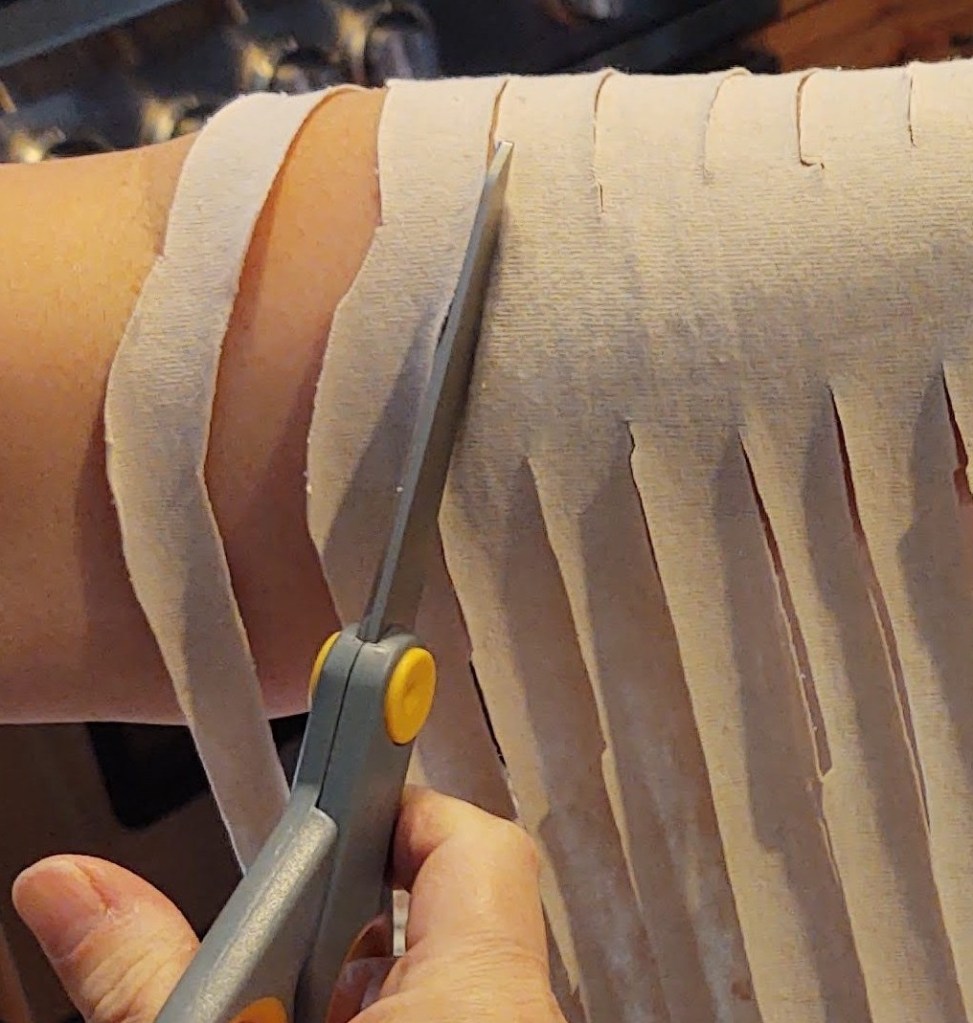
Now, cut one inch strips through the 4 layers of fabric, just past where the bottom meets the top and it transitions to 2 layers, but not all the way to the top or you will have many separate small strips.
Close up of top showing where to stop cutting
Using a rotary cutter with a very sharp blade will work on the first pass, provided you use enough pressure.
Scissors can also be used, but is more difficult to get a straight line.
Strips prepared
Fan the “strips” out to ensure all are cut through. If any fibers are hanging on, cut them with scissors or the rotary cutter
Close up of strips needing attention
Now, the fun part!
Slide your left hand between the two layers of the T-shirt at the top
Insert arm between uncut layers
You’ll be cutting across the intact area (what was the 2-layer part) to make one long strip.
Grab your scissors and starting on the left side, make a diagonal cut into the top edge of the intact area. This will be one end of the long strip.
First cut
Now, make a diagonal cut across each strip with the beginning of the cut being the lower left of the intact area and the end of the cut being the top right of the next strip.
Diagonal cut bottom left to top right
Continue on to the end. The last cut will be similar to the first cut to end the strip.
The last cut
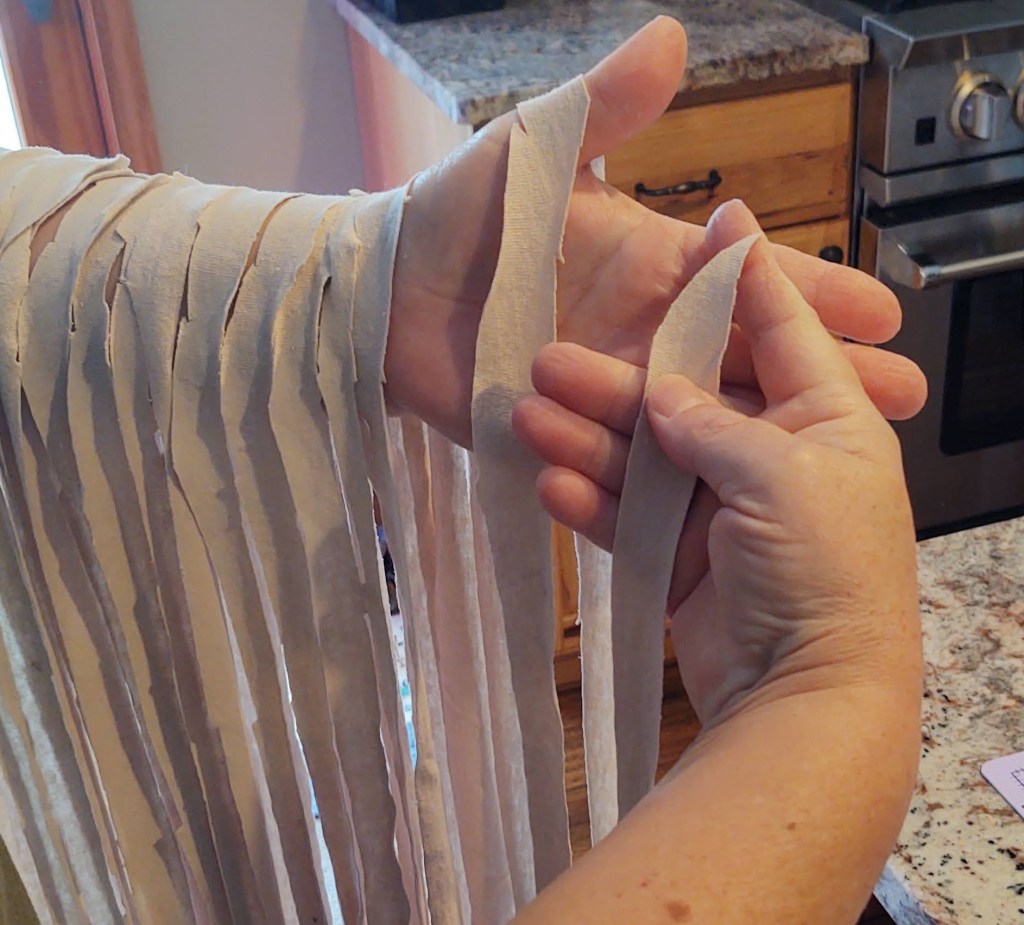
Beginning with one end, pull the strip through your other loose fist. Then, go back the other way.
Run length through loose fist, pulling slightly
This will stretch the material out a bit and also make it more like a rope than a flat piece of fabric.
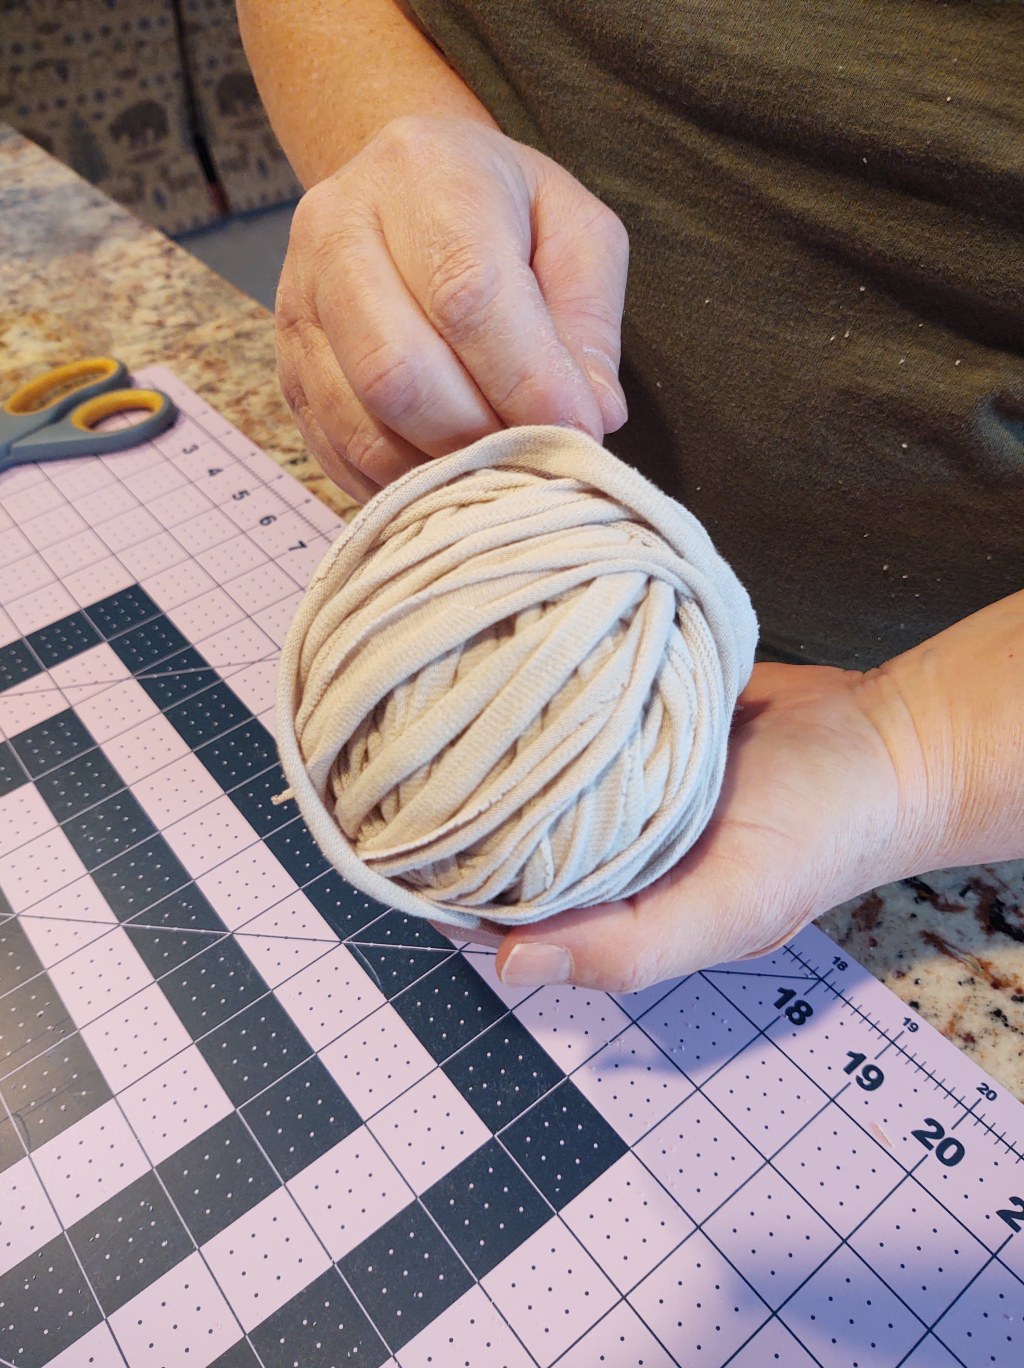
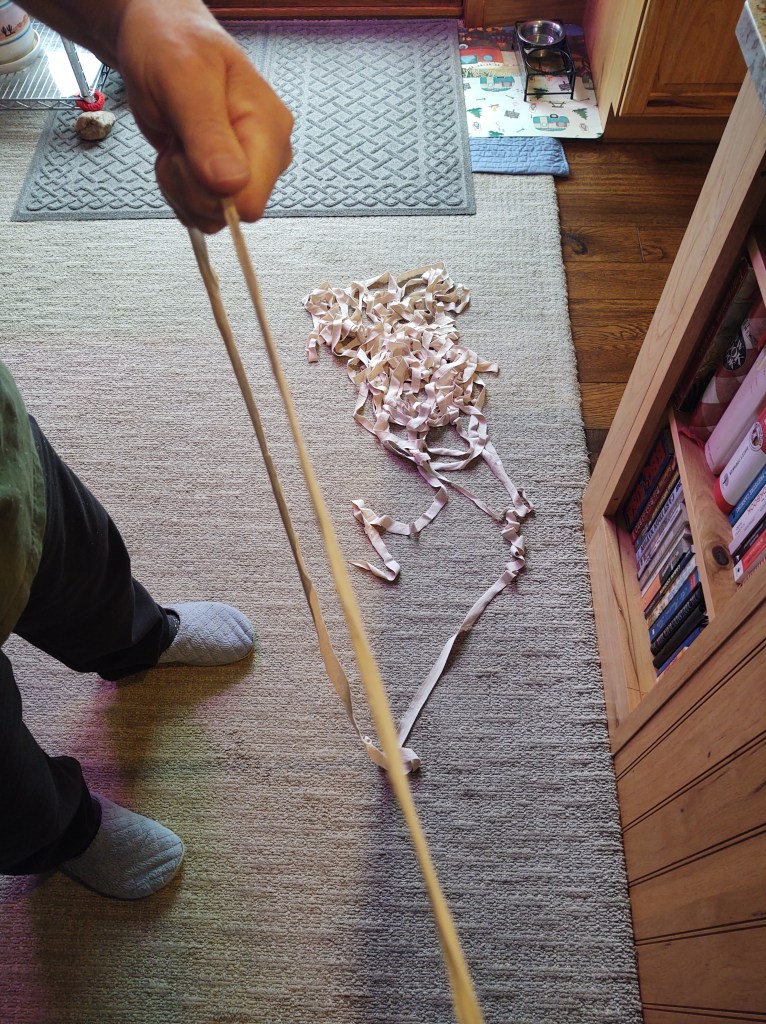
Once that is all done, start with one end and roll the whole thing into a ball.
Roll strip into ball
You’re done!!
Ready for use!
Now, when your homegrown tomatoes, peppers, cucumbers (really, anything growing on a trellis or stake) need to be tied up, you can cut off the length you need and tie it on.
I would suggest making a figure 8 when you tie it so the plant is not too close to the stake or post, which could cause damage to the stem. This also gives you a good place to cut the tie off in the fall.
If you’ve used a cotton T-shirt, the ties can go right into the compost.
Dried beans are readily available and fairly cheap at the grocery store, but have you ever just wanted to grow your own?
I do! Because, now I know how they were grown, harvested, and stored. Plus, they don’t take up much room, but do take up a bit of time.
In my gardening zone of 5a, I direct-seed plant in late May and harvest in late September.
My bean of choice to grow is the Navy Pea Bean. Otherwise known as Navy Beans. They are a small, white bean. We love them in Pork ‘n Beans as well as in soups, stews, and Mexican dishes, all of which we make from scratch.
In a 3 foot wide bed, I sowed 150 bean seeds, about 2 inches apart, across two rows about 6 inches apart. I harvested 6 pounds of beans in September.
Navy beans are a “half-pole” bean, meaning they do put out a tendril, but those only grow about 4 feet high, as opposed to “pole” beans, which can exceed 7 feet.
They are planted at the same time and using the same method as bush beans; however, they will need a trellis of some type to climb. I am still finding my favorite type of trellis to use. I’ve tried strings and trellis netting, but will be trying cattle panel this year. Stay tuned for the outcome.
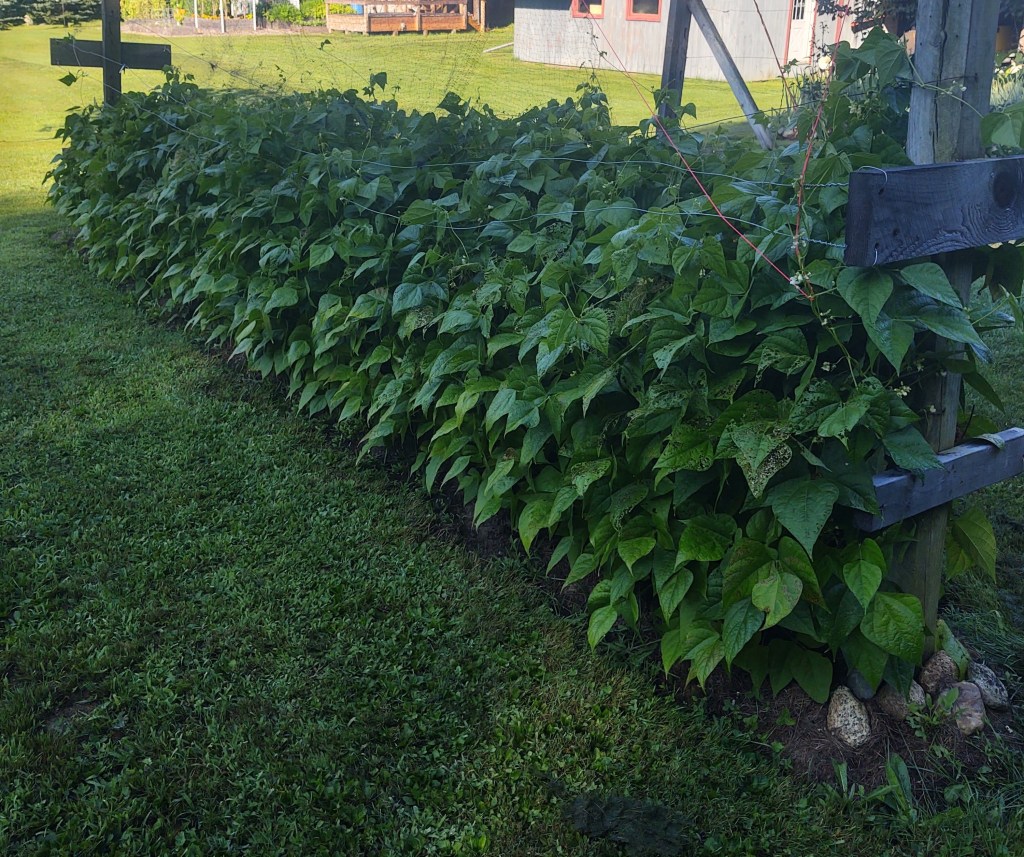
The bean plants will also want to have plenty of air movement around them. This will help them dry when the time comes. My Navy Bean bed is out on its own, away from my other beds.
Summer Growth
Now, this is where the difference in growing dried beans compared to fresh-eating beans comes in. As the beans form, resist the urge to pick them. They aren’t great fresh eating, although I suppose you could eat them if you were desperate!
The beans will grow, produce tendrils, flower, and produce green bean pods. Then the foliage will turn yellow, then brown, then fall off. The bean pods, meantime, will turn yellow and begin to dry out. Leave them alone!
The bean pods will turn brittle when they are ready to harvest. Don’t wait too long because they will twist themselves open and spill the actual beans all over the ground, making them difficult to pick up.
Almost ReadyNow they’re ready!
When they are ready and it’s a dry, sunny day. Pick the bean pods off the plants and place in a paper bag or on a bedsheet or whatever works for you.
Paper bag harvesting method
A note on weather – We are located in the west central portion of New Hampshire and the days in September can be cold and rainy.
I’ve had years where the pods stay nice and yellow (as shown above) and years where the pods look moldy, but dry – kind of a mottled gray color.
This is all due to the weather and can’t really be helped. I shouldn’t say that…one year I did harvest them just when they started to get mottled and put them in my dehydrator on 110 F for quite a while to help them dry.
You could also bring them in the house and spread them out on a clean bedsheet on the floor and run a dehumidifier and/or a fan to help them finish drying.
Honestly, my go to is to hope for good weather!
I digress.
Time to hull the beans. I’ve seen people stomp on them between two bed sheets, shake up the bag they are in until the beans release, and I’m sure there are many more methods.
I prefer to simply grab three bowls – one for unhulled beans, one for the navy beans inside, and one for the empty hulls, which then go into the compost.
I shell them sitting in my easy chair with a refreshing beverage!
Now, they’re ready for storage until you want to eat or can them. I keep them in vacuum sealed half-gallon mason jars in the pantry.
Store beans in vacuum sealed, half-gallon jars
What I do with them
Leave dry and soak and cook as needed
Can them up!
Since it’s just the two of us, I can them in half-pint jars. Because they are low-acid, beans must be pressure canned. Using my stovetop All American 921, I can can (haha) 23 half-pints in one batch. This way, when my husband, John (The White Mountain Sicilian), wants Mexican night or soup night, or whatever, he can just grab, open, and cook!
Pressure can for future use
Make and can Pork n’ Beans
I found a recipe we like in one of my canning books, modified it a bit (of course) and can up a double recipe which lasts us most of the year.